Filing returns electronically
ProSeries Basic Edition electronic filing software is installed with ProSeries Basic Edition tax products that support electronic filing.
ProSeries Basic Edition software supports electronic filing of the following:
|
▪
|
State individual returns (for 41 states and the District of Columbia) and extensions (for Massachusetts and New York returns)
|
IRS Web site. To visit the e-file Providers area of the IRS Web site, go to http://www.irs.gov, select Tax Professionals, then select e-file Providers. If you prefer, you can go directly to http://www.irs.gov/taxpros/providers/index.html.
|
PINs required. The IRS requires that tax practitioners e‑file individual income tax returns with Practitioner PINs or taxpayer Self-Select PINs. Tax practitioners can’t submit a paper signature for e‑filed returns using Form 8453. The redesigned Form 8453 will be used only to transmit required supporting paper documents.
|
|
You must have a valid EFIN. If you don’t have an IRS‑issued Electronic Filing Identification Number (EFIN) yet, see Preparing for electronic filing.
|
For detailed information about electronic filing:
|
▪
|
Go to http://www.proseries.com and select E-File Resources at the bottom of the screen, or
|
|
▪
|
Use the Search Help feature on the Help toolbar or in the Help Center.
|
Establishing an Internet connection
To file electronically, you need to connect to the Internet from the computer on which the ProSeries Basic Edition program is installed.
If you don’t have an Internet connection, you must first sign up for service with an Internet Service Provider (ISP). Once you have an ISP, go to the Help menu, select Internet Connection Setup, then follow the instructions in the dialog boxes.
Setting up the ProSeries Basic Edition program for electronic filing
If you’ve already entered your electronic filing information, proceed to Step 1 - Mark the return for electronic filing.
If you haven’t entered your electronic filing information yet, take the following steps to set up the ProSeries Basic Edition electronic filing options.
|
1
|
Go to the Help menu and select Options Setup Wizard.
|
|
2
|
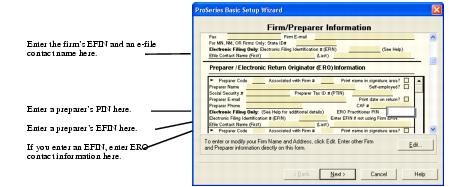
EFINs. In the Firm/Preparer Information dialog box, enter the firm’s Electronic Filing Identification Number (EFIN) in the Firm Information section, and enter preparers’ Electronic Filing Identification Numbers (EFINs) in the Preparer/Electronic Return Originator (ERO) Information section. After you enter an EFIN, complete the corresponding Efile Contact Name fields.
|
PINs. PINs (Personal Identification Numbers) are used as electronic signatures. Enter each preparer’s PIN in the ERO Practitioner PIN field. A Practitioner PIN is any five‑digit code (except all zeros) chosen by each preparer.
|
3
|
In the Filing Client Returns Electronically dialog box, select Yes, some returns may be filed electronically.
|
If more than one computer will be using the same EFIN
When ProSeries Basic Edition software is installed on a computer, the DCN (Declaration Control Number) counter is set at “00001.” The program assigns that number to the first federal return that’s marked for electronic filing, then increments the DCN counter by “1.” As each subsequent federal return is marked for electronic filing, the program assigns the current DCN to that return, then increments the DCN counter by “1.”
|
If your firm will be filing returns electronically from more than one computer, and each computer is using the same EFIN, change the starting number in the DCN counter in the program on all but one computer before preparers start to transfer or prepare returns. By advancing the DCN counter sufficiently in the program on each “additional” computer, each return marked for electronic filing will be assigned a unique DCN. For example, advance the DCN counter to “01001” on the second computer, to “02001” on the third computer, and so on.
|
|
If a computer will be using a unique EFIN, it’s not necessary to change the starting number in the DCN counter for that computer.
|
To change the starting number in the DCN counter for a computer:
|
1
|
Go to the Tools menu, then select Options.
|
|
2
|
Select Electronic Filing in the left side of the Options dialog box.
|
|
3
|
Go to the DCN Counter field and increase the number.
|
Step 1 - Mark the return for electronic filing
|
1
|
Open the client’s federal return, go to the Federal Information Worksheet, scroll down to Part V - Return Preparer and Third Party Designee, then make sure the appropriate preparer code is entered in the Preparer Code field.
|
|
If you’re acting as an ERO and filing a return for another preparer, enter that preparer’s preparer code in the Preparer Code field.
|
|
2
|
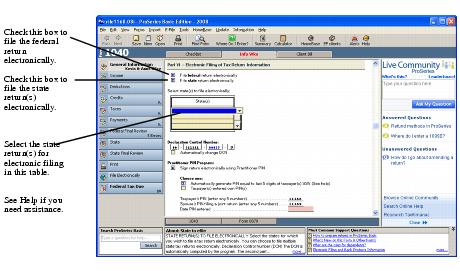
In Part VI - Electronic Filing of Tax Return Information, make sure the File federal return electronically box is checked.
|
|
3
|
State returns. If you’re going to file the client’s state return(s) electronically, make sure the File state return electronically box is checked and select the appropriate state return(s) in the State(s) table.
|
Note the following about the three EF filing types for state individual returns.
|
EF filing type
|
||
|
California, Illinois, Maine, Massachusetts, and Minnesota
|
Independent EF filing type state returns don’t have to be electronically filed with the corresponding federal return. Returns for these states are electronically filed directly with the state taxing authority.
|
|
|
Fed/State EF filing type state returns must be electronically filed with the corresponding federal return. Returns for Hawaii are electronically filed to the IRS, then sent to the state taxing authority.
|
||
|
Fed/State or State‑Only
|
36 states that aren’t an Independent state or a Fed/State state
|
Fed/State or State‑Only EF filing type state returns don’t have to be electronically filed with the corresponding federal return. Returns for these states are electronically filed to the IRS, then sent to the state taxing authority.
|
|
4
|
DCN information. Note that the program assigns a DCN to the client’s return(s).
|
PIN Information. Complete the appropriate fields in the Practitioner PIN Program section.
QuickZooms. When applicable, use the QuickZoom buttons near the end of Part VI to go directly to the apporpriate worksheet(s) and/or statement.
|
5
|
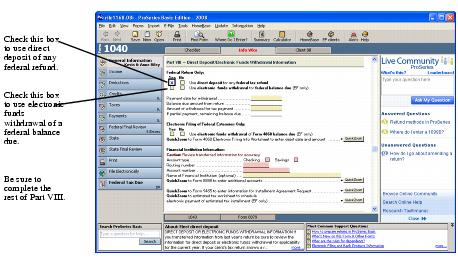
Direct Deposit/Direct Debit. If the client wants their refund deposited directly into their account or the balance due withdrawn from their account, complete Part VIII - Direct Deposit/Electronic Funds Withdrawal Information.
|
Step 2 - Prepare the client’s return(s) for electronic filing
|
2
|
Complete the Electronic Filing Smart Worksheets on the client’s Form W‑2, 1099‑R, W2‑G, and 1099‑G worksheets (if applicable).
|
|
3
|
RAL or RT. If you’re offering Bank Products through Santa Barbara Bank & Trust and the client wants a Refund Anticipation Loan or Refund Transfer, complete the applicable parts of the Bank Product Information Worksheet.
|
|
4
|
Click the State button in the Left Navigation Area.
|
|
6
|
Click the General Information button in the Left Navigation Area.
|
|
7
|
Go to the toolbar and click the Save button.
|
Avoiding common reasons for rejection
|
▪
|
Verify the client’s social security number (SSN) and Date of Birth (DOB) with the Social Security Administration (SSA).
|
|
▪
|
If you’re preparing a Married Filing Joint return, verify that the spouse’s last name on the return matches the spouse’s last name on his or her Social Security card.
|
|
▪
|
Make sure the employer’s name and federal identification number on the actual Form W‑2 match the information you’ve entered in the ProSeries Basic Edition program.
|
|
▪
|
Make sure the payer’s name and federal identification number on the actual Form W‑2G or Form 1099‑R match the information you’ve entered in the ProSeries Basic Edition program.
|
|
▪
|
Use error‑checking during data entry. To do so, open a return, then go to the View menu and make sure there’s a check mark before Error Alerts.
|
Step 3 - Run Final Review from the client’s return
After you complete a federal or state return, run the ProSeries Basic Edition Final Review to help you check the return for errors.
|
1
|
To review the open federal return, click the Federal Final Review button in the Left Navigation Area.
|

To review the open state return, click the State Final Review button in the Left Navigation Area.
|
3
|
Click Recheck to check the return for errors.
|
|
4
|
Go to the IRS e‑file Authentication Statement in the client’s federal return, make sure the box at the top of the form is checked, then complete the remainder of the form.
|
For more information, click the Help button ![]() while the IRS e‑file Authentication Statement is open on the screen.
while the IRS e‑file Authentication Statement is open on the screen.
Take similar steps for the client’s state return(s), if applicable.
|
5
|
Print Form 8879, IRS e‑file Signature Authorization, in the client’s return, then instruct the taxpayer (and spouse if applicable) to sign and date the form.
|
|
You are required to keep a signed and dated copy of Form 8879, IRS e‑file Signature Authorization, for three years.
|
|
6
|
Review the federal return and any state returns (including forms concerning electronic filing and bank products) with the client before proceeding.
|
|
7
|
If you determine that the client must submit printed copies of specific documents after the client’s federal return has been accepted by the IRS, review Form 8453 in the client’s federal return. Also review any corresponding electronic filing paperwork forms in the client’s state return(s), if applicable.
|
Step 4 - From the EF Clients view, select the return(s)
You can select a client’s return(s) for electronic filing from the client’s open return or from the HomeBase EF Clients view.
Selecting returns from the client’s open return
|
1
|
Click the File Electronically button in the Left Navigation Area.
|
|
2
|
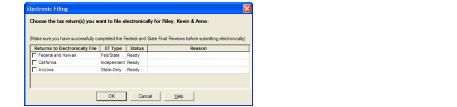
In the Electronic Filing dialog box, check the box for each of the client’s returns that you want to file electronically.
|
|
3
|
Click OK.
|
The program closes the client’s return, opens HomeBase with the EF Clients tab selected, then starts the electronic filing process.
Selecting returns from the HomeBase EF Client’s view
|
1
|
If HomeBase is on the screen, click the EF Clients tab below the toolbar. If a client’s return is on the screen, go to the toolbar and click the EF Clients button.
|
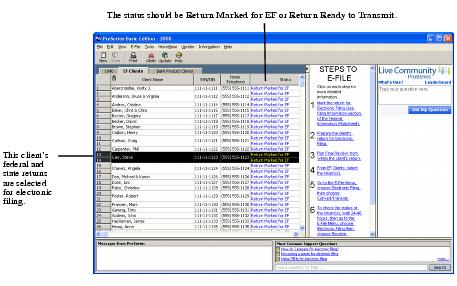
The HomeBase EF Clients view presents important information about each client return that you’ve prepared and marked for electronic filing, including the status of each return.
|
2
|
Select the client’s returns that you want to file electronically. Their status should be Return Marked for EF or Return Ready to Transmit.
|
State returns. State returns are listed after the client’s federal return. Select a client’s federal and state returns at the same time. To select more than one return, hold down the CTRL key while you click each return that you want to file electronically.
|
If you select returns for more than one client, the program instructs you to select the return(s) for only one client.
|
|
While California, Illinois, Maine, Massachusetts, and Minnesota returns do not need to be electronically filed with the corresponding federal return, it’s best to do so. If a North Dakota or South Carolina return isn’t filed with the corresponding federal return, that state return can’t be electronically filed until the federal return is accepted.
|
Step 5 - Convert and transmit the selected return(s)
You can convert and transmit a client’s return(s) from the client’s open return or from the HomeBase EF Clients view.
Transmitting returns that were selected from the client’s open return
If you selected a client’s return(s) for electronic filing from the client’s open return (as explained in Selecting returns from the client’s open return), take the following steps:
|
1
|
If the Electronic Filing Transmission dialog box asks “Do you want to continue with the convert/transmit process?”, select Yes.
|
|
2
|
Dialog boxes keep you informed. When the program finishes transmitting the return(s), the Electronic Filing Transmission log opens. This log indicates whether each return was successfully transmitted and, if returns were not successfully transmitted, the reason why they were not successful.
|
|
3
|
Click Print to print the contents of the Electronic Filing Transmission log.
|
|
4
|
Click Close to close the Electronic Filing Transmission log.
|
Transmitting returns that were selected from the HomeBase EF Clients view
If you selected a client’s return(s) for electronic filing from the HomeBase EF Clients view (as explained in Selecting returns from the HomeBase EF Client’s view), take the following steps:
|
1
|
Go to the E‑File menu, select Electronic Filing, then select Convert/Transmit Returns and Extensions.
|

|
3
|
If you see a Pay‑Per‑Return dialog box, authorize payment for the indicated client files.
|
|
4
|
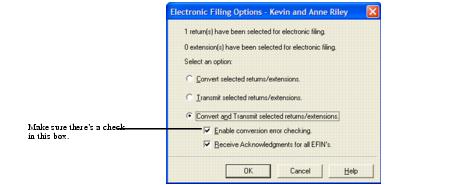
In the Electronic Filing Options dialog box, select Convert and Transmit selected returns/extensions.
|
|
5
|
Make sure the Enable conversion error checking box is selected.
|
|
A return that cannot pass error checking will usually get rejected by the IRS. Therefore, do not disable conversion error checking unless directed to do so by a ProSeries Basic Edition Technical Support Representative.
|
|
6
|
Check the Receive Acknowledgments for all EFINs box if more than one EFIN was entered in the Firm/Preparer Information section of the Options dialog box and you want to receive electronic filing acknowledgments for all EFINs (not just the EFIN associated with the return that’s being electronically filed now).
|
|
7
|
Click OK.
|
When the ProSeries Basic Edition program finishes converting and transmitting the returns, the Transmit Electronic Filing Returns/Extensions Log opens so you can review the results.
Step 6 - Wait 24 to 48 hours, then check for acknowledgments
|
The ProSeries Basic Edition program automatically checks for acknowledgments when you transmit client returns. It may take more than 48 hours to receive an acknowledgment for some federal and state returns.
|
To check for acknowledgments from the IRS or state taxing authorities:
|
1
|
Go to the HomeBase EF Center. If HomeBase is on the screen, click the EF Clients tab below the toolbar. If a return is on the screen, go to the toolbar and click the EF Center button.
|
|
2
|
Select the client’s return in the EF Center, click the right mouse button, then select View Electronic Filing Status History to open the client’s Electronic Filing Client Status History for that federal or state return.
|
|
There’s a separate Electronic Filing Client Status History for each federal and state return. Open the Electronic Filing Client Status History for each return.
|
|
3
|
Review the Electronic Filing Client Status History and identify the most recent status of the client’s return, then click Close.
|
|
If a client’s return was rejected, the report shows why it was rejected, and how to fix the error.
|
|
4
|
If the most recent status of the return is “Return Rejected,” proceed to Resolving a problem with a rejected return.
If the most recent status of the return isn’t “Return Accepted” or “Return Rejected,” continue with step 5.
|
5
|
Go to the E‑File menu and point to Electronic Filing.
|
|
6
|
From the Electronic Filing menu, select Receive Acknowledgment Statuses to get the latest acknowledgments.
|

|
7
|
In the Receive Electronic Filing Acknowledgments Log, click View Acks to see the detailed Acknowledgment Report.
|
If there aren’t any acknowledgments, View Acks is not available. In most cases, you will receive a client’s federal acknowledgment before you receive the client’s state acknowledgment.
|
8
|
Review the information, then click Close. If the return was rejected, continue with Resolving a problem with a rejected return next.
|
Resolving a problem with a rejected return
|
●
|
If HomeBase is on the screen, click the EF Clients tab below the toolbar.
|
|
●
|
If a return is on the screen, go to the toolbar and click the EF Center button.
|
|
2
|
Go to the E‑File menu, point to Electronic Filing, select Electronic Filing Reports, then print a Rejected Returns report.
|

|
3
|
Incorrect SSN. If a return was rejected because the taxpayer’s social security number wasn’t correct, print the Intuit Electronic Postmark Report before correcting the social security number and resubmitting the return. This provides the original date and time of filing.
|
|
6
|
Re‑filing state returns. If you’ve filed a client’s federal and state returns together and the federal return is accepted but the state return is rejected, in most cases you can re‑file the corrected state return electronically.
Step 7 - Complete the electronic filing process
Federal return. After you receive an acknowledgment that the IRS has accepted a client’s federal return, take these steps:
|
1
|
Form 8453. If the client is required to file additional documents with the IRS, print Form 8453, U.S. Individual Income Tax Transmittal for an IRS e‑file Return, attach the required paper documents to Form 8453, then mail Form 8453 and the attached documents to the appropriate IRS service center within the applicable time period.
|
|
The Preparing Form 8453 section of the Electronic Filing Information Worksheet identifies the paper documents to attach to the client’s Form 8453.
|
|
The Additional Information Smart Worksheet on Form 8453 shows the address to which the client’s Form 8453 should be mailed.
|
|
2
|
Print Form 9325. Print Form 9325, Acknowledgment and General Information for Taxpayers Who File Returns Electronically, if you want to give the form to the client.
|
|
The use of Form 9325 is optional, but you do need to retain a completed copy of Form 8879, IRS e‑file Signature Authorization, that’s been signed by the client. You might need to retain a completed copy of state electronic filing paperwork also.
|
|
3
|
Balance due. If the client’s federal return has a balance due and the client did not elect to have their bank account directly debited, print Form 1040‑V, Balance Due Payment Voucher and give it to your client.
|
|
If your client owes federal taxes, he or she must mail Form 1040‑V and the payment to the IRS by the filing deadline.
|
State returns. After you receive an acknowledgment that the state taxing authority has accepted a client’s individual return, take these steps:
|
1
|
Mail the completed state electronic filing paperwork to the appropriate state service center within the time period required by the appropriate taxing authority (if the state taxing authority requires electronic filing paperwork).
|
|
You might need to retain a completed copy of state electronic filing paperwork.
|
|
2
|
Balance due. If the client owes state taxes, follow the state instructions. You’ll probably need to give the client a printed copy of a completed state tax payment voucher along with appropriate instructions.
|
|
3
|
Getting current information. To review common reject reasons, troubleshooting information, and frequently‑asked questions from http://www.proseries.com, do either of the following:
|
|
●
|
While in the ProSeries Basic Edition HomeBase EF Clients view, go to the Steps to E‑File section, then click the Search Online for EF Answers button.
|
|
●
|
While in your Internet browser, go to http://www.proseries.com, select Products, then select E-File Resources at the bottom of the page.
|
For more information about electronic filing, use the Search Help feature on the Help toolbar or in the Help Center.
|
IRS refund cycle. For information about the IRS refund cycle, go to the IRS Web site at http://www.irs.gov.
|
